
Spring is almost here, and with it comes the delightful excuse to celebrate with sweet treats! These Mini Easter Cheesecake Jars offer a playful, no-bake dessert that’s as cheerful as the season itself. With layers of buttery cookie crumbs, silky cheesecake filling, and colorful candy toppings, these jars are not just eye-catching—they’re also make-ahead and portion-controlled, making them perfect for gatherings with family and friends. Whether you’re hosting an Easter brunch or need a kid-friendly treat to brighten your day, these Mini Easter Cheesecake Jars are sure to bring joy to your table. Ready to make your dessert table vibrant and festive? Let’s dive in!

Why are Mini Cheesecake Jars a Must-Try?
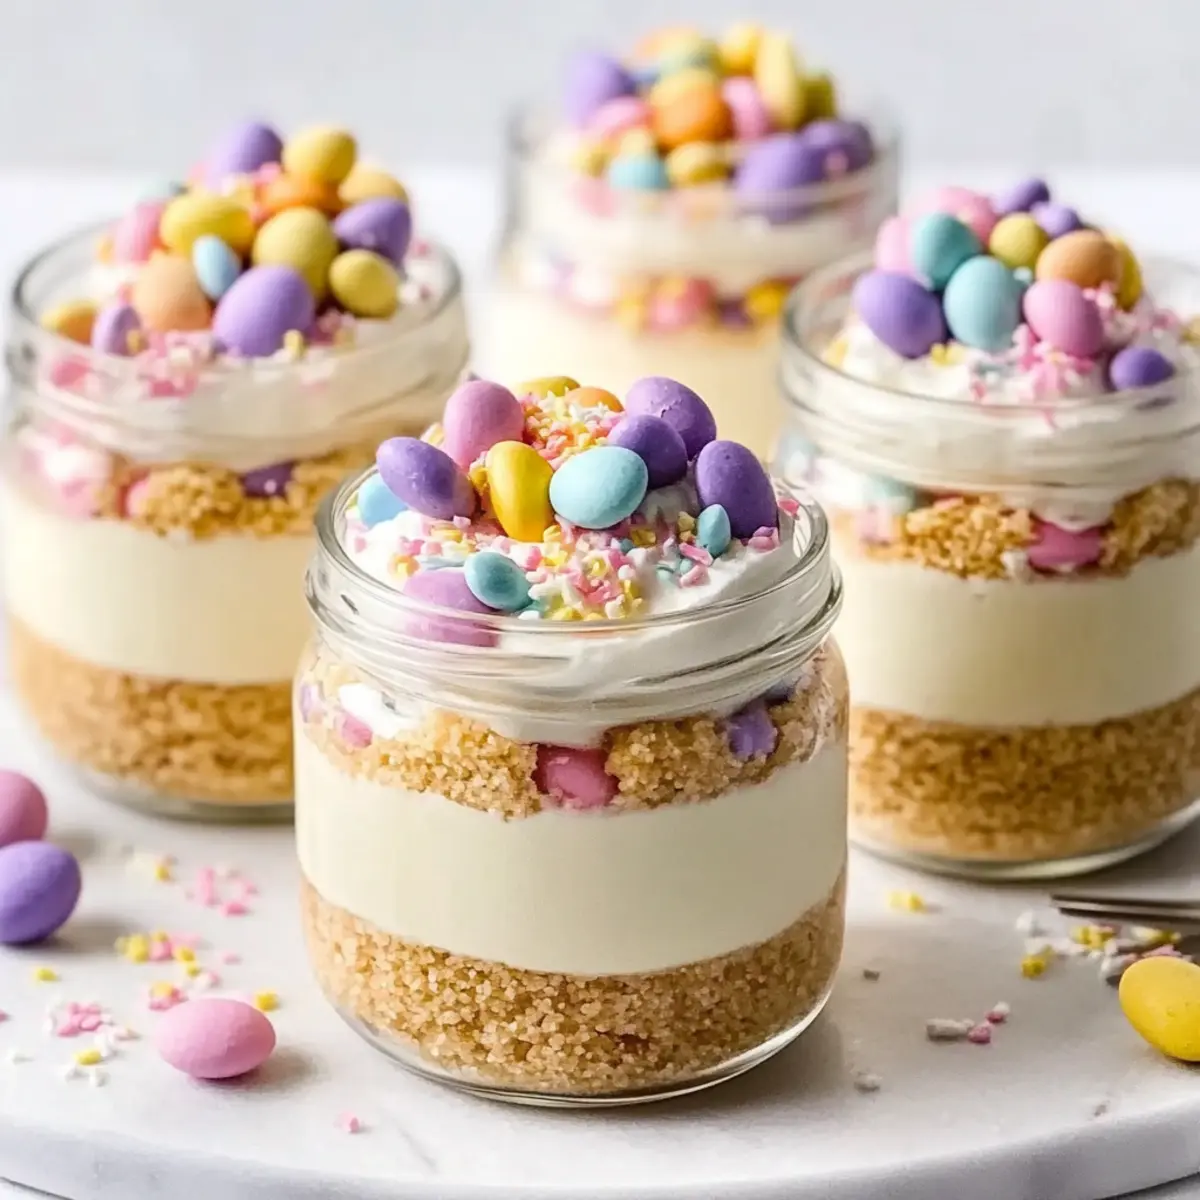
Joyful Presentation: These Mini Easter Cheesecake Jars are not only delicious but also visually stunning, making them the perfect centerpiece for your dessert table this spring.
Quick and Easy: With a no-bake recipe, you’ll save valuable time in the kitchen, allowing you to focus on more celebrations or to enjoy quality time with loved ones.
Kid-Friendly Fun: Let kids get creative by decorating their own jars, transforming the process into a fun family activity!
Made for Sharing: Ideal for potlucks or brunch gatherings, these individual servings are perfect for sharing and portion control.
Flavorful Customization: Experiment with flavors like a chocolate version or a berry garden twist to keep things exciting. Don’t forget to check out our Vanilla Bean Cheesecake for more sweet inspiration!
Mini Easter Cheesecake Jars Ingredients
For the Crust
- Graham cracker crumbs – Provides structure and crunch for the crust. Substitute with digestive biscuits if desired.
- Unsalted butter (melted) – Binds the crumbs together. Can be substituted with coconut oil for a dairy-free version.
- Sugar – Adds sweetness to the crust. Use brown sugar for a deeper flavor.
- Pinch of salt – Enhances the overall flavor of the crust.
For the Cheesecake Filling
- Cream cheese (softened) – Adds creaminess and body to the filling. Ensure it’s softened but not melted to avoid runniness.
- Powdered sugar – Sweetens the filling and gives it a smooth texture. Can reduce to 1/3 cup for less sweetness.
- Vanilla extract – Provides flavor depth. Substitute with almond extract for a different flavor.
- Lemon juice – Brightens the cheesecake flavor. Can add extra zest for more tartness.
- Cold heavy whipping cream – Whipped to integrate air and create a light filling. Do not use softened cream; it must be cold for whipping.
Optional Color and Flavor
- Gel food coloring – To tint the filling in pastel shades. Avoid liquid food coloring which may alter texture.
- Lemon zest or almond extract – Adds additional flavoring as desired.
For the Toppings
- Mini chocolate eggs or jelly beans – Fun Easter candy for decoration. Use any favorite candy with seasonally bright colors.
- Pastel sprinkles – For added festive flair.
- Shredded coconut (dyed green) – Optional decoration to mimic grass.
Equipment Needed
- Small jars (4–6 oz) – Ideal for individual servings. Ensure they are sturdy for stacking.
Step‑by‑Step Instructions for Mini Easter Cheesecake Jars
Step 1: Prepare the crust
In a mixing bowl, combine graham cracker crumbs, sugar, and a pinch of salt. Pour in the melted unsalted butter and mix until the texture resembles wet sand. Pack 2-3 tablespoons of the crumb mixture into each small jar, pressing down firmly to create a solid base. This crust will provide the structure for your delightful Mini Easter Cheesecake Jars.
Step 2: Whip the cream
Using a cold mixing bowl and beaters, whip the heavy cream on medium-high speed until medium-stiff peaks form, which should take about 3-4 minutes. The whipped cream should hold its shape but remain soft and velvety. Set it aside carefully, as this will contribute to the light, airy texture of your cheesecake filling.
Step 3: Beat cream cheese mixture
In another mixing bowl, beat softened cream cheese with powdered sugar, vanilla extract, and lemon juice until the mixture is smooth and fluffy, approximately 1-2 minutes. Ensure there are no lumps, as a creamy filling is key for your Mini Easter Cheesecake Jars. This bright and sweet mixture creates the perfect base for your cheesecake filling.
Step 4: Fold in whipped cream
Gently fold the whipped cream into the cream cheese mixture using a spatula. Be careful not to overmix, as you want to maintain the airiness of the whipped cream. Continue folding until no streaks remain, creating a light and fluffy cheesecake filling. This step is crucial for achieving that delightful consistency in your Mini Easter Cheesecake Jars.
Step 5: Tint filling (optional)
If desired, divide the cheesecake filling into separate bowls and add gel food coloring to create pastel shades. Mix gently until combined, ensuring the color is evenly distributed without overworking the mixture. This will add a cheerful touch to your Mini Easter Cheesecake Jars, making them visually appealing for your festive occasion.
Step 6: Fill jars
Using a piping bag or a spoon, carefully layer the cheesecake filling over the prepared crust in each jar, leaving about half an inch of space at the top for toppings. This layering creates a beautiful presentation, showcasing the vibrant filling against the crust. Make sure the filling is evenly distributed for a delicious balance in every spoonful.
Step 7: Chill
Cover each jar with lids or plastic wrap and refrigerate for at least 2 hours, or up to 24 hours, to allow the filling to set properly. This chilling time helps the flavors meld together and creates a sliceable, yet creamy texture when you’re ready to serve the Mini Easter Cheesecake Jars.
Step 8: Decorate
Just before serving, unleash your creativity by topping each jar with shredded green coconut, pastel sprinkles, and mini chocolate eggs or jelly beans. This festive decoration will enhance the cheerful appearance of your Mini Easter Cheesecake Jars, making them a hit at any spring celebration.

Expert Tips for Mini Easter Cheesecake Jars
-
Chill Everything: Start by chilling your mixing bowls and beaters. Cold equipment helps achieve the best volume when whipping cream for your Mini Easter Cheesecake Jars.
-
Don’t Overmix: When folding whipped cream into the cream cheese mixture, be gentle to maintain airiness. Overmixing can lead to a dense filling.
-
Pack the Crust: Ensure you pack the graham cracker crust firmly in the jars. This prevents it from crumbling when you serve the Mini Easter Cheesecake Jars.
-
Color Wisely: Use gel food coloring rather than liquid to tint your cheesecake filling. This helps maintain a smooth texture in your jars.
-
Interactive Fun: Encourage kids to help with layering and decorating. This makes for a delightful family activity while creating delicious Mini Easter Cheesecake Jars!
Mini Easter Cheesecake Jars Variations & Substitutions
Feel free to let your creativity shine by customizing these delightful Mini Easter Cheesecake Jars to suit your taste!
- Dairy-Free: Substitute cream cheese with a plant-based cream cheese and use coconut whipped cream for a creamy, dairy-free delight.
- Gluten-Free: Use gluten-free cookie crumbs for the crust to keep these jars friendly for gluten-sensitive guests without sacrificing flavor.
- Chocolate Twist: Replace the graham cracker crust with chocolate cookie crumbs and stir in cocoa powder for a rich, chocolatey cheesecake base.
- Fruit-Filled Delight: Layer fresh berries or a berry compote between the crust and filling for an unexpected fruity surprise. This addition adds a fresh burst of flavor!
- Nutty Flavor: Include finely chopped nuts like almonds or pecans in the crust for an extra layer of crunch and flavor. This twist brings a wonderful texture contrast to each bite.
- Caramel Drizzle: Swirl in some caramel sauce throughout the cheesecake filling for a luscious flavor boost. This delightful surprise will surely please anyone with a sweet tooth!
- Exotic Spice: Add a pinch of cardamom or cinnamon to your filling for a subtle warmth. It creates a lovely depth of flavor while maintaining the festive spirit.
- Lemon Zing: For an even zippier version, mix in lemon zest or replace lemon juice with lime juice to alter the tartness. This brightens things up beautifully!
Don’t forget to check out our tasty Fried Strawberry Cheesecake for more dessert inspiration or our creamy Cheesecake Pumpkin Swirl that’s perfect for fall!
Storage Tips for Mini Easter Cheesecake Jars
Fridge: Store covered jars in the refrigerator for up to 3 days without the toppings to keep the cheesecake filling fresh and creamy.
Freezer: For longer storage, freeze the jars without toppings for up to 1 month. Thaw overnight in the fridge before serving to maintain the perfect texture.
Reheating: These Mini Easter Cheesecake Jars are best served chilled and do not require reheating. Simply add your favorite toppings just before serving to keep them vibrant and appealing.
Make-Ahead: You can prepare these jars up to 24 hours in advance. Just remember to add your fun toppings right before serving for that extra festive flair!
Make Ahead Options
These Mini Easter Cheesecake Jars are a fantastic option for meal prep, allowing you to save time and reduce stress during busy holidays! You can prepare the crust and cheesecake filling up to 24 hours in advance; simply layer the crust in the jars and refrigerate. For the filling, whip up the cream cheese mixture, fold in the whipped cream, and store it separately until you’re ready to assemble. Just before serving, spoon the filling over the crust, add your colorful toppings, and enjoy a delicious dessert without the fuss. This method ensures that your cheesecake jars remain just as delightful and fresh, making your festive get-together a breeze!
What to Serve with Mini Easter Cheesecake Jars
Create the perfect spring meal to complement these delightful dessert jars.
-
Fresh Berry Salad: A vibrant mix of strawberries, blueberries, and raspberries adds a refreshing touch that balances the creamy richness of the cheesecake. This salad brings a pop of color and is a healthy option for your guests.
-
Lemon Blueberry Scones: Soft and buttery with a hint of lemon, these scones bring a delightful flavor pairing with the cheesecake. Serve them warm for an inviting twist that enhances the sweetness of your jars.
-
Sparkling Lemonade: This effervescent beverage adds a zesty fizz to your meal, cleansing the palate between bites of the cheesecake. Serve chilled with fresh mint or a slice of lemon for an extra touch of freshness.
-
Easter Egg Cheese Platter: Combine a colorful assortment of cheeses, nuts, and seasonal fruits for a beautiful, shareable platter. The creaminess of the cheeses pairs well with the cheesecake, while the nuts add a satisfying crunch.
-
Chocolate-Dipped Strawberries: These decadent bites provide an indulgent treat that echoes the sweetness of the cheesecake topping. The fruitiness complements the flavors while adding another layer of texture and richness.
-
Mini Easter Egg Hunt Cake: A whimsical cake decorated with candy-coated eggs mirrors the playful spirit of your cheesecake jars. It provides an additional sweet option for dessert lovers and creates a festive atmosphere.
-
Vanilla Bean Ice Cream: A scoop of this classic ice cream melts beautifully beside the cheesecake, enhancing its creamy texture and flavor. A drizzle of caramel or chocolate sauce can take this pairing to the next level.
-
Herbed Vegetable Platter: A selection of fresh veggies with a creamy dip offers a crunchy contrast to your dessert. The herbaceous flavors create a refreshing counterpoint to the sweetness of the Mini Easter Cheesecake Jars.
-
Lemon Tart: A tangy, sweet tart balances the dessert table with bright citrus flavors that harmonize beautifully with the cheesecake. This adds an elegant touch that’s perfect for spring celebrations.

Mini Easter Cheesecake Jars Recipe FAQs
How do I select ripe ingredients for my Mini Easter Cheesecake Jars?
Absolutely! For the best flavor, choose cream cheese that is fully softened—look for a smooth texture when you press your finger on it. Fresh lemons for the juice should be firm with a bright yellow hue, avoiding any that have dark spots or feel overly squishy.
What is the best way to store Mini Easter Cheesecake Jars?
Keep your covered jars in the refrigerator for up to 3 days without toppings. If you want to save them longer, freeze them (without toppings) for up to 1 month. Thaw them in the fridge overnight before serving to keep their delightful texture.
Can I freeze Mini Easter Cheesecake Jars? If so, how?
Certainly! To freeze your Mini Easter Cheesecake Jars, first, remove any toppings. Cover each jar tightly with plastic wrap or a lid and place them in the freezer. They’ll stay good for about a month! When you’re ready to enjoy, thaw them overnight in the fridge before adding your favorite decorations.
What if my cheesecake filling turns out runny?
Very! If you find the filling too runny, it may be due to under-whipped cream or overmixing when combining the whipped cream and cheese mixture. To troubleshoot, whip your cream in a chilled bowl until medium-stiff peaks form (about 3-4 minutes). Then, fold gently into the cream cheese mixture until fully combined, being careful not to deflate it. This will enhance its stability and texture.
Are Mini Easter Cheesecake Jars safe for kids with allergies?
Well, this recipe contains common allergens like dairy and gluten. For a kid-friendly, allergen-friendly option, use gluten-free graham crackers and ensure that any toppings like candies or sprinkles are also gluten-free. Always double-check labels if you have concerns about allergies to make sure everyone can join in on the sweet fun!
What are the best decorative toppings for Mini Easter Cheesecake Jars?
The more the merrier! You can use mini chocolate eggs, jelly beans, pastel sprinkles, or even dyed shredded coconut to mimic grass. Let the kids help—they will enjoy personalizing their jars and making them as festive as possible!
Mini Easter Cheesecake Jars - No-Bake Delight for Spring Fun
Ingredients
Equipment
Method
- Prepare the crust by combining graham cracker crumbs, sugar, and a pinch of salt. Mix in melted unsalted butter until it resembles wet sand. Pack 2-3 tablespoons into each jar.
- Whip the cold heavy cream until medium-stiff peaks form. This should take about 3-4 minutes.
- In another bowl, beat the softened cream cheese, powdered sugar, vanilla extract, and lemon juice until smooth and fluffy, approximately 1-2 minutes.
- Gently fold the whipped cream into the cream cheese mixture, being careful not to overmix.
- If desired, tint the filling with gel food coloring for pastel shades.
- Layer the cheesecake filling over the crust in each jar, leaving space for toppings.
- Cover each jar and refrigerate for at least 2 hours to allow the filling to set.
- Decorate with shredded green coconut, pastel sprinkles, and mini chocolate eggs or jelly beans just before serving.
Leave a Reply