
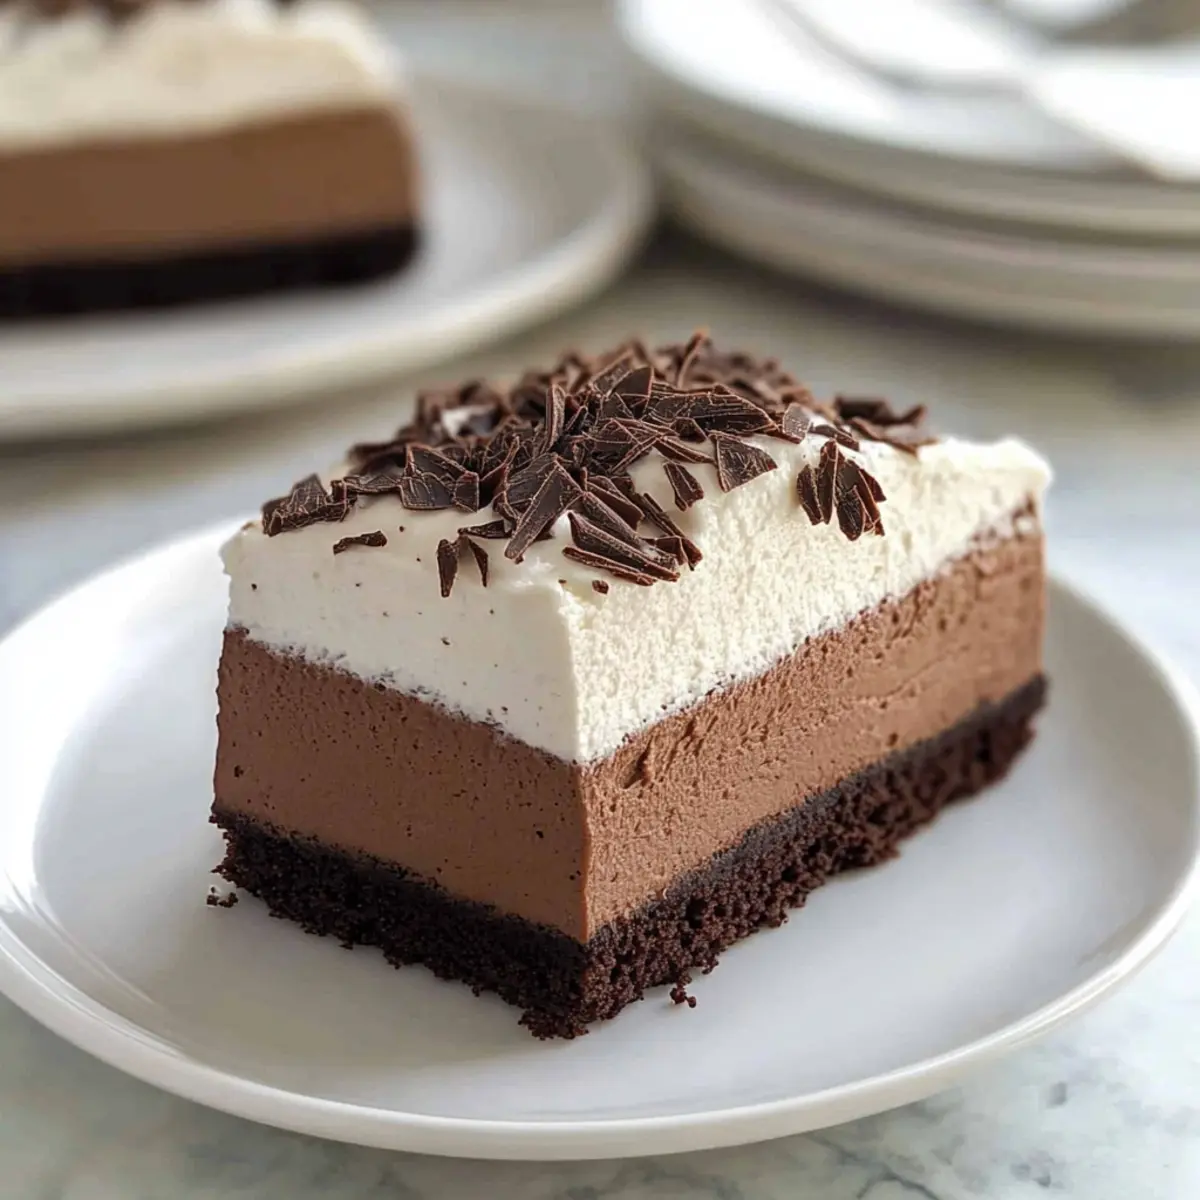
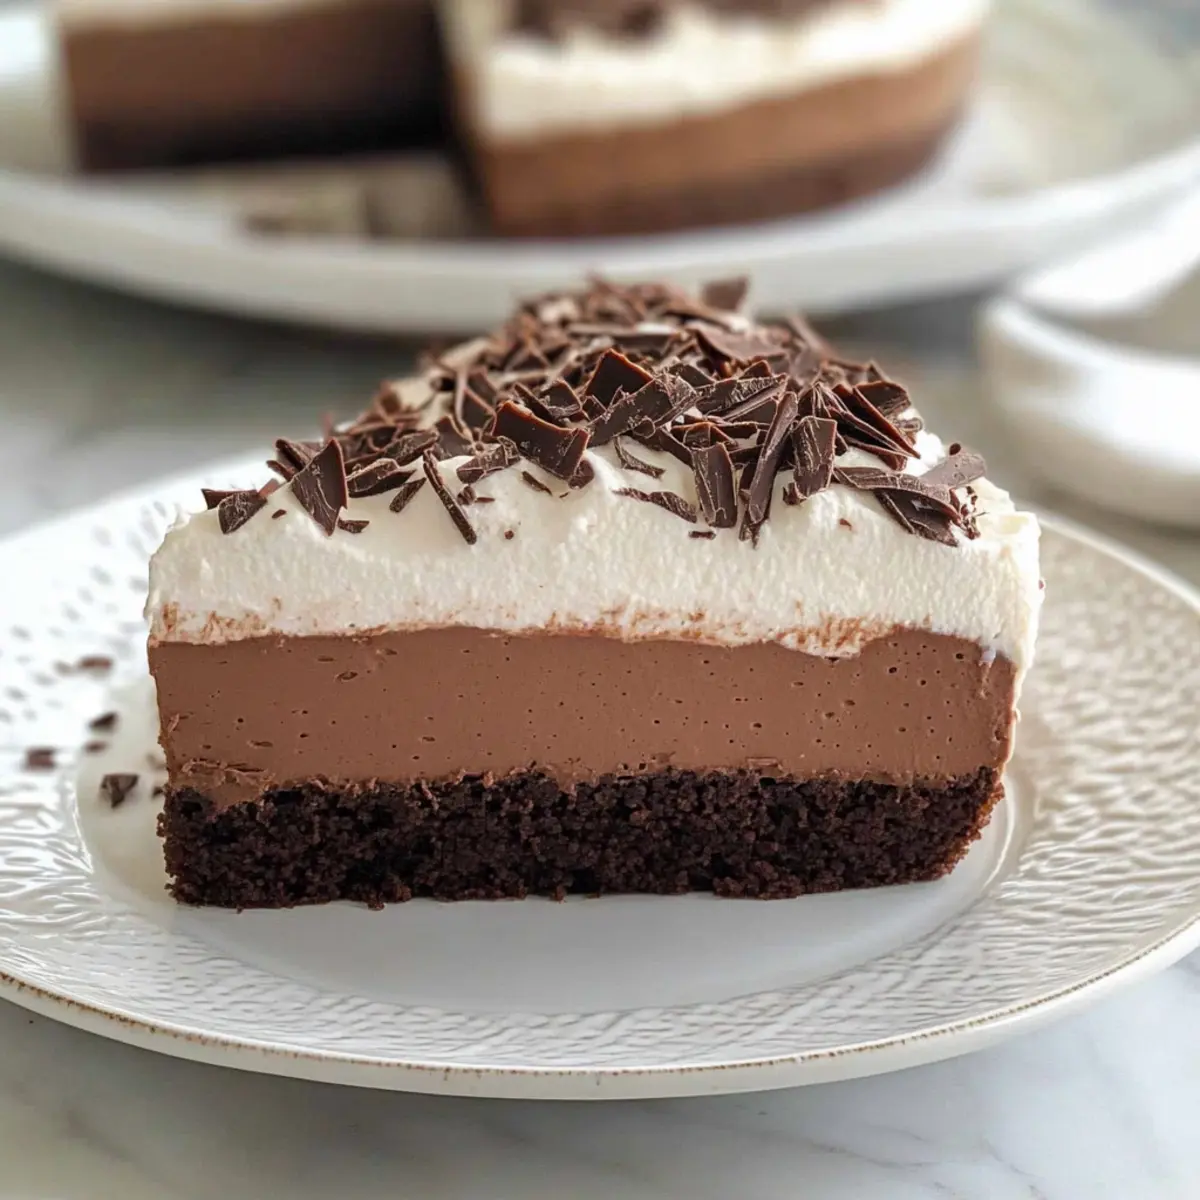
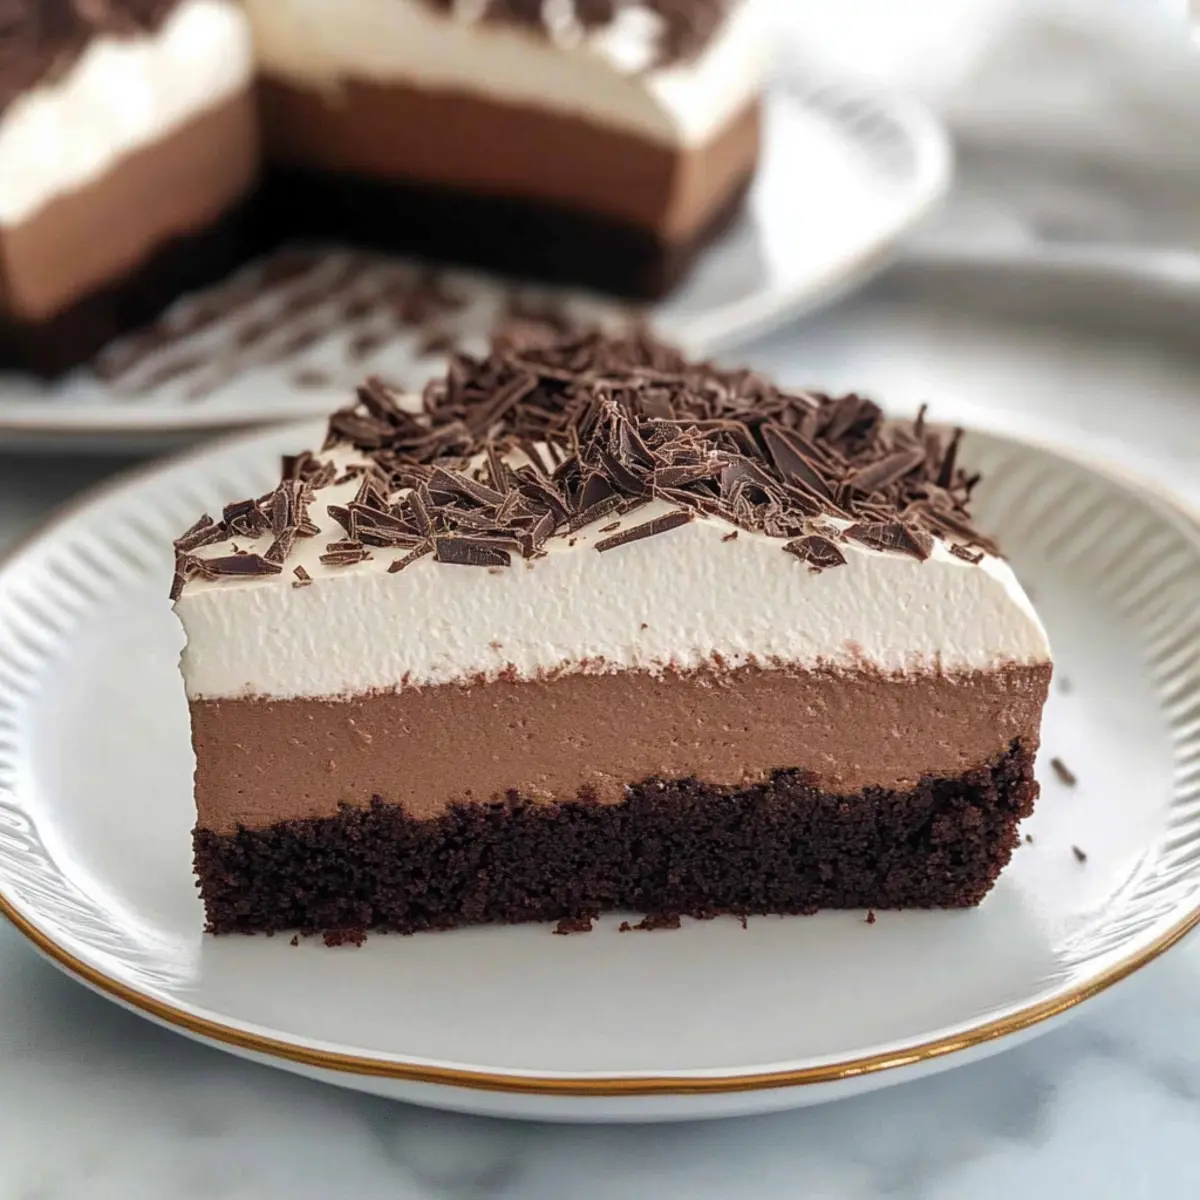
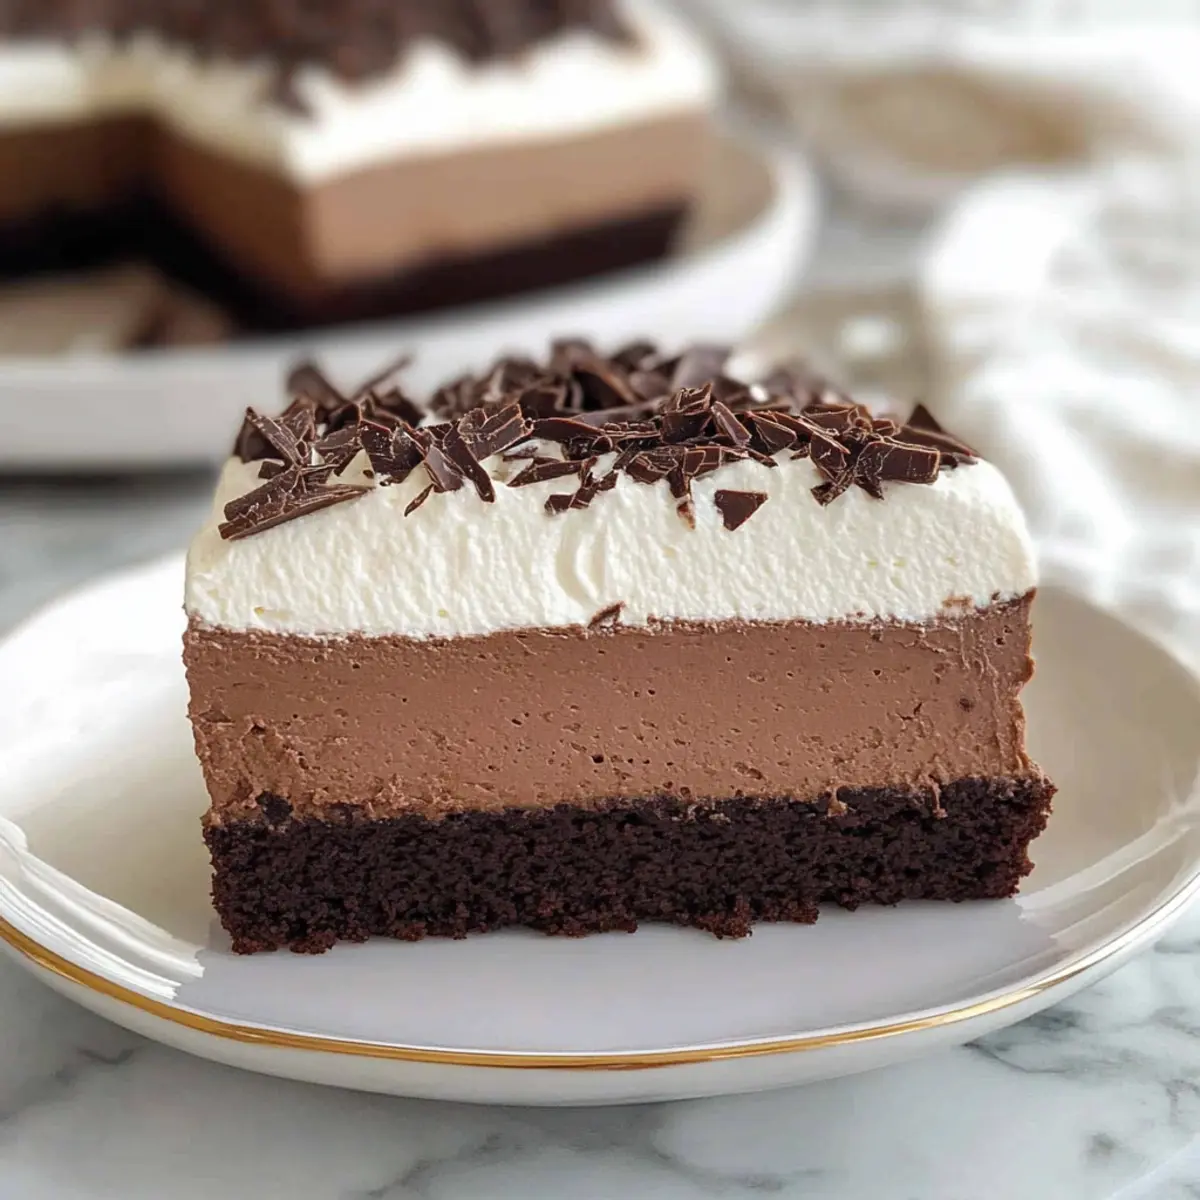
Beneath the glimmering lights of celebration, there’s nothing quite like the rich allure of a homemade dessert to elevate any gathering. Cue my Gluten-Free Chocolate Mousse Cake, a delightful creation that combines a chewy brownie-like base with a velvety cream cheese chocolate mousse. It’s a treat that not only satisfies chocolate cravings but also makes for an impressive centerpiece at birthdays and special occasions. With its quick prep and crowd-pleasing reputation, this cake shines as a guilt-free indulgence for those seeking a gluten-free option. Are you ready to dive into a slice of decadence that everyone will adore?
Why is This Cake a Must-Try?
Decadent Indulgence: Each bite of this Gluten-Free Chocolate Mousse Cake promises a heavenly combination of a chewy brownie-like base and a fluffy mousse made with cream cheese.
Easy to Make: With straightforward instructions, even beginner bakers can create this stunning dessert effortlessly.
Crowd Pleaser: Perfect for birthdays or gatherings, it will impress everyone, gluten-free or not!
Flexible Variations: Customize it using different types of chocolate or try a dairy-free cream cheese for an alternative twist.
Make Ahead Convenience: Assemble it a day early, letting flavors meld together for an even richer taste. Enjoy this indulgent dessert alongside other delightful treats like Chocolate Tuxedo Cake and Chocolate Orange Cheesecake for a sweet banquet!
Gluten-Free Chocolate Mousse Cake Ingredients
• Gather your baking essentials for this rich and delightful creation!
For the Cake Base:
- Bittersweet or Semisweet Chocolate – Vital for flavor and richness, opt for high-quality chips or bars.
- Butter – Adds moisture and richness; can be substituted with dairy-free butter for a dairy-free version.
- Sugar – Standard granulated sugar ensures the cake’s perfect sweetness.
- Eggs – Essential for providing structure and moisture, holding your cake together beautifully.
- Vanilla Extract – Enhance flavor with pure vanilla extract for the best results.
- Salt – Balances sweetness, a small yet essential ingredient for flavor depth.
- Gluten-Free 1:1 Baking Flour – Provides structure without gluten; popular brands include Bob’s Red Mill or King Arthur.
For the Chocolate Mousse:
- Cream Cheese – Creates a creamy, luscious texture; ensure it’s softened before use for a smooth mix.
- Powdered Sugar – Sweetens the mousse and assists in maintaining structure.
- Cold Heavy Cream – Key to achieving a thick and fluffy mousse; select brands with 35% milk fat or higher.
For the Whipped Cream Topping:
- Cold Heavy Cream – Whip this high-fat cream for a delicious topping that holds its shape.
- Powdered Sugar – Adds sweetness to balance the whipped cream’s rich texture.
- Vanilla Extract – A splash enhances the overall flavor of the whipped cream.
- Grated Chocolate – Optional garnish that adds a touch of decoration and extra chocolatey delight.
Step‑by‑Step Instructions for Gluten-Free Chocolate Mousse Cake
Step 1: Preheat the Oven
Begin by preheating your oven to 325°F (163°C). This is the perfect temperature to create a moist and chewy brownie-like base for your Gluten-Free Chocolate Mousse Cake. While the oven is heating, prepare a 10-inch springform pan by greasing it lightly with cooking spray to prevent sticking later on.
Step 2: Bake the Cake Layer
In a microwave-safe bowl, melt 1 cup of bittersweet or semisweet chocolate along with ½ cup of butter for about 1 minute until smooth. Stir in 1 cup of granulated sugar, 1 teaspoon of vanilla extract, and a pinch of salt. Whisk in 3 large eggs one at a time, ensuring each is fully incorporated. Gradually fold in 1 cup of gluten-free 1:1 baking flour until the batter is smooth. Pour the batter into the prepared springform pan and bake for 30-35 minutes or until a toothpick inserted in the center comes out clean. Allow the cake to cool completely in the pan.
Step 3: Prepare the Chocolate Mousse
Once the cake has cooled, it’s time to make the luscious chocolate mousse. Melt another 8 ounces of bittersweet or semisweet chocolate and let it cool slightly. In a mixing bowl, combine the melted chocolate with 8 ounces of softened cream cheese and ½ cup of powdered sugar. Beat these together until smooth and well-blended. Slowly pour in 1 cup of cold heavy cream and continue to mix until the mousse is light and fluffy, which should take about 3-4 minutes on medium speed.
Step 4: Assemble the Cake
Now that your cake base and mousse are ready, it’s time to put them together! Carefully spread the chocolate mousse evenly over the cooled brownie-like base in the springform pan. Use a spatula for a smooth finish. Cover the assembled cake with plastic wrap and refrigerate for at least 6 hours, or overnight, to allow the mousse to set and flavors to meld beautifully.
Step 5: Make the Whipped Cream Topping
When your cake is set and you’re ready to serve, prepare the whipped cream topping. In a chilled mixing bowl, whip 1 cup of cold heavy cream with 2 tablespoons of powdered sugar and 1 teaspoon of vanilla extract until stiff peaks form. The cream should hold its shape beautifully.
Step 6: Serve the Cake
Carefully unlock and remove the sides of the springform pan, revealing your beautiful Gluten-Free Chocolate Mousse Cake. Generously spoon the whipped cream over the mousse layer, smoothing it with the spatula. For an elegant finishing touch, garnish with grated chocolate. Slice the cake into portions and dive into this indulgent dessert, being sure to savor each rich, chocolatey bite!
Gluten-Free Chocolate Mousse Cake Variations
Feel free to personalize this delightful dessert and take it to the next level of deliciousness!
-
Dairy-Free: Substitute cream cheese with a dairy-free option like vegan cream cheese or whipped coconut cream for an equally delightful mousse. This will still give you that creamy texture without the dairy!
-
Flavor Infusion: Swap the bittersweet chocolate with your favorite chocolate types—milk chocolate for sweetness or dark chocolate for a richer taste. Each option will bring a different flavor profile to the cake, perfect for chocolate aficionados.
-
Nutty Touch: Add finely ground nuts or nut flour (like almond flour) into the brownie base for a delightful crunchy texture and nutty flavor. This twist not only enhances flavor but adds a satisfying crunch!
-
Berry Bliss: Fold in fresh raspberries or cherries into the mousse before spreading it on the cake. The berries add a refreshing tartness that beautifully complements the rich chocolate flavor.
-
Spice It Up: Incorporate a pinch of cayenne or cinnamon into the chocolate batter for a warmth that elevates the entire flavor profile. This unexpected twist can surprise and delight your taste buds!
-
Coffee Lovers: Enhance the chocolate mousse with a teaspoon of instant coffee or espresso powder. The coffee deepens the chocolate flavor, making it even more irresistible.
-
Decadent Toppings: Instead of plain whipped cream, try topping your cake with whipped cream infused with orange zest or flavored extracts for an aromatic experience. The slight citrus notes can elevate each slice beautifully!
-
Mini Versions: Bake the brownie layer in muffin tins for individual-sized portions. Layer them with mousse and whipped cream for impressive bite-sized desserts, great for parties or gatherings.
Consider pairing your Gluten-Free Chocolate Mousse Cake with other sweet delights for a full dessert spread, like a slice of Moist Classic Carrot Cake or some homemade Hummus Veggie Rice Cake for a delightful contrast of flavors!
Expert Tips for Gluten-Free Chocolate Mousse Cake
-
Quality Chocolate Matters: Use high-quality bittersweet or semisweet chocolate for the base and mousse, as it significantly enhances the flavor.
-
Cool Completely: Allow the brownie base to cool completely before adding the mousse. This prevents melting and ensures a perfect layered effect.
-
Fluffy Mousse: For the best texture in your mousse, whip the heavy cream until it reaches stiff peaks. This will create a light and airy chocolate mousse.
-
Garnish Elegantly: Top with freshly whipped cream and grated chocolate for a beautiful presentation that showcases your delicious Gluten-Free Chocolate Mousse Cake.
-
Chill Time: Don’t skip the chilling! Refrigerate the assembled cake for at least 6 hours or overnight; this helps the mousse set properly and better melds the flavors.
Storage Tips for Gluten-Free Chocolate Mousse Cake
Fridge: Store any leftovers in an airtight container in the refrigerator for up to 3 days to maintain freshness and texture.
Freezer: Avoid freezing the assembled cake, as the mousse and whipped cream may deflate. If necessary, freeze individual slices wrapped tightly for up to 2 weeks.
Reheating: Although this cake is best enjoyed chilled, if you prefer a slightly warm texture, let it sit at room temperature for 15-20 minutes before serving.
Make Ahead: You can prepare the Gluten-Free Chocolate Mousse Cake a day in advance, assembling it and refrigerating to allow the mousse to set beautifully.
What to Serve with Gluten-Free Chocolate Mousse Cake
Indulging in a rich chocolate dessert can be even more delightful when complemented by the right dishes or drinks that elevate the experience.
-
Creamy Vanilla Ice Cream: A scoop of silky vanilla ice cream adds a contrast of temperature and flavor, creating a heavenly combination. The ice cream’s creaminess balances the rich mousse perfectly.
-
Fresh Berries: Strawberries or raspberries offer a burst of freshness that cuts through the richness, enhancing each bite with a hint of tartness. Pairing these with a drizzle of chocolate sauce can create a delightful flavor explosion.
-
Chocolate Ganache Drizzle: For true chocolate lovers, a warm chocolate ganache drizzle over the mousse can intensify the dessert’s decadence. It’s a chocolate lover’s dream come true!
-
Espresso or Coffee: The bold flavors of a fresh cup of espresso or coffee beautifully complement the chocolate cake, enhancing its rich notes. Plus, the warmth of the drink contrasts wonderfully with the chilled mousse.
-
Mint Sugar Cookies: Light and crispy, these cookies add a refreshing flavor that pairs excellently with the chocolate. The soft texture of the mousse and crunchy cookie create an inviting textural contrast.
-
Light Fruit Salad: A light fruit salad with citrus or melon can cleanse the palate between bites, making each taste of cake even more enjoyable. It’s a refreshing companion to balance the indulgence.
-
Sparkling Wine: A light sparkling wine or champagne serves as an elegant accompaniment that elevates the dessert experience, adding a celebratory touch to any gathering. The bubbles enhance the excitement with each sip.
-
Chocolate-Covered Pretzels: These sweet and salty delights add a fun crunch that contrasts with the soft mousse, making each mouthful an adventure in flavor. They’re an ideal snack alongside a slice of cake.
-
Whipped Cream Topping: Serve additional whipped cream on the side to add extra fluffiness to each slice. The airy texture perfectly complements the dense, rich mousse.
Each of these offerings will ensure your decadent dessert stands out, making your celebration one to remember!
Make Ahead Options
These Gluten-Free Chocolate Mousse Cakes are a dream come true for busy home cooks looking to save time without sacrificing flavor! You can prepare the brownie-like cake base up to 24 hours in advance; simply let it cool completely before wrapping tightly in plastic wrap and refrigerating. The chocolate mousse can also be made ahead of time; just store it in the fridge for up to 3 days. When ready to serve, assemble the cake by spreading the mousse over the chilled cake and refrigerating for at least 6 hours (or overnight) to allow it to set beautifully. By following these prep in advance tips, you’ll have a show-stopping dessert ready with minimal effort, ensuring that it’s just as delicious when the time comes to enjoy!
Gluten-Free Chocolate Mousse Cake Recipe FAQs
How do I select the right chocolate for the cake?
Absolutely! For the best flavor, choose high-quality bittersweet or semisweet chocolate. Look for bars with a cocoa content of 60% or higher for a rich taste, or opt for chocolate chips from trusted brands.
How should I store leftovers, and how long do they last?
After serving, store any leftovers in an airtight container in the refrigerator for up to 3 days. Make sure to keep it well-covered to retain its delicious moisture and texture. If you find yourself with extra slices, you can freeze them individually wrapped tightly in plastic wrap for up to 2 weeks.
Can I freeze the Gluten-Free Chocolate Mousse Cake?
I recommend avoiding freezing the assembled cake since the whipped cream and mousse may deflate and lose their texture. However, if you must freeze, it’s best to freeze individual slices. Wrap them tightly in plastic wrap and then place them in a freezer-safe bag. When ready to eat, let them thaw in the refrigerator overnight for the best results.
What should I do if my mousse is too runny?
If your mousse doesn’t have the desired thickness, it might be due to not whipping the heavy cream enough. Ensure you whip the cream until it reaches stiff peaks before folding it into the chocolate mixture. If you’ve already combined the ingredients, you can gently place the mixture in the refrigerator for about 30 minutes to help it set before spreading it on the cake.
Is this recipe suitable for those with dairy allergies?
Absolutely! For a dairy-free version of the Gluten-Free Chocolate Mousse Cake, substitute the cream cheese with a dairy-free alternative, such as vegan cream cheese or whipped coconut cream. Also, ensure you use dairy-free butter in the cake layer. Check labels on all ingredients to ensure they meet dietary needs.
What are some signs that my ingredients are ripe and ready to use?
When using chocolate, look for glossy slabs or chips without any whitish bloom, which indicates the chocolate has been properly stored. For eggs, fresh eggs have a rounded shape and are free of cracks. When it comes to cream cheese, choose blocks that are soft and easy to mix; avoid those that are overly hard or have a strange odor.
Irresistible Gluten-Free Chocolate Mousse Cake to Delight You
Ingredients
Equipment
Method
- Preheat your oven to 325°F (163°C) and grease a 10-inch springform pan lightly with cooking spray.
- Melt 1 cup of bittersweet or semisweet chocolate and ½ cup of butter in a microwave-safe bowl for about 1 minute until smooth.
- Stir in 1 cup of granulated sugar, 1 teaspoon of vanilla extract, and a pinch of salt.
- Whisk in 3 large eggs one at a time, ensuring full incorporation.
- Fold in 1 cup of gluten-free 1:1 baking flour until the batter is smooth and pour into the prepared pan.
- Bake for 30-35 minutes or until a toothpick comes out clean. Allow to cool completely.
- Melt another 8 ounces of bittersweet or semisweet chocolate and let cool slightly.
- In a mixing bowl, combine the melted chocolate with 8 ounces of softened cream cheese and ½ cup of powdered sugar, and beat until smooth.
- Add 1 cup of cold heavy cream and mix until light and fluffy, approximately 3-4 minutes on medium speed.
- Spread the chocolate mousse evenly over the cooled brownie-like base.
- Cover with plastic wrap and refrigerate for at least 6 hours or overnight.
- Whip 1 cup of cold heavy cream with 2 tablespoons of powdered sugar and 1 teaspoon of vanilla extract until stiff peaks form.
- Remove the sides of the springform pan and spoon the whipped cream over the mousse layer.
- Garnish with grated chocolate and serve.
Leave a Reply